The Prototype Is Here!
Shame on me, I’m getting lazy with this blog. A terrific amount of things happened last month, but I missed the time or energy to write about them.
So this is going to be a monster post. Sit back, relax, and enjoy the reading.
Money, Money, Money
Let’s talk about money first. I was in the metalab two weeks ago and could finally profit of their “shop“. Actually, you just take whatever you need and leave the money in a box. Best. Shop. Ever :-)
They don’t have much choice, but all the basic components are there. I spent 15€, mostly for a bigger breadboard (5€), jumper wires (6€) and a couple assorted parts.
I also went again last week to the megastore with my son, mainly to show him around. While there, I spent another 25€. Which is funny, because I basically wanted to buy knob caps for my pots, a 4-pin connector (male+female+crimp contacts) to connect the monotron and my sequencer, plus some audio jacks, and a couple of resistors and capacitors.
Well, they didn’t have the knob caps I wanted. Neither did they have the connectors. Man, I hate it when you take extra time to travel there, only to hear something isn’t available. Next time I will buy online. At least they are supposed to have what they claim to have.
Anyway, I ended up buying the other small bits, plus 3 superluxury aluminium caps (2.39€ each!) And a supercheapo digital multimeter (7€). Not that I really need it at the moment, but it’s a useful tool to have around.
This makes a grand total of 190€ so far.
I know what you are thinking right now: with that money, I could have bought a monotribe and saved myself a lot of troubles :-)
But it’s not only about the money of course. And by the way, I have way more pieces in my arsenal than simply the equivalent of a monotribe! One point, however, remains: DIY is not, generally speaking, as cheap as it seems.
When you see articles like “build yourself a supermegadooperthing for under 10$”, don’t believe them. Or at least, be conscious that they’re oversimplifying. Ok, the raw part list can be under 10$, but then you have to find a shop that has them all, pay postage delivery, some components are really that cheap if you order them in stocks of 100, then you need the tools, etc.
I’m not discouraging you from getting into DIY. I love it! When you build a supermegadooperthing, it’s your supermegadooperthing, and this is, as Visa puts it, priceless :-)
But enough ranting. Let’s move to the next chapter.
Hannibal The Cannibal
This is probably one of the funniest activity in DIY electronics: breaking apart old, broken or worthless gadgets or devices to recycle (or “cannibalize”) components.
I rummaged my kid’s toy drawers for some unused gems, and I could find a tiny “music box” (from a McDonald’s Happy Meal) and a crappy FM radio.
So I went to my kid and we had more or less this conversation:
Me: Say, kid, do you still need these things?
Son: Uhm… don’t know. No, probably not. Why do you ask?
Me: It’s for… science!
Son (with raised eyebrow): What?
Then I explained him what I was up to, and showed him my DIY box. He was very intrigued :-)
We opened the gadgets and I proceeded to cannibalize the components. I got one piezo speaker and a switch very easily. Other things I had to dissolder from the PCBs.
That was hard! In comparison, soldering is easy cheesy. I spent like 2 hours fighting with the solder pen and the sucker tin pump. I managed to obtain 2 standard 6x6mm pushbuttons, but unfortunately the 3.5mm audio jack socket I wanted didn’t survive, and the plastic casing melted a bit…
Interesting experience, indeed. But I think I will avoid desoldering in future unless really, really needed.
Son, Meet Monotron. Monotron, Meet Son
Of course I also showed the monotron to my son. I’m not sure he quite grasped the concept of sequencing, but there’s time for it.
The first thing he said was “Dad, but… it’s old”. ++ to Korg’s designers for capturing that vintage look. “Old” is a synonym for “vintage”, isn’t it? :-)
Anyway, I showed him how it works, and he picked it up quite fast. It has been his favourite toy for like 1 week. He even brought it to school for a sort of show & tell in the music lesson! He told me the teacher spent a couple of minutes himself playing with it. Something I didn’t expect at all. If you think about it, kids learn about several musical instruments in the school. Flute, piano, guitar, etc. But nobody spends a word about synthesizers. The monotron is perfect to learn the basics: one oscillator, one filter and minimal modulation.
But whatever, let’s leave teaching to teachers and focus on our blog’s topic.
I even had a soldering session together with my son. He liked it a lot! You know, the solder pen has the subtle charm of dangerous things, which makes it irresistible to a 11 year old kid. I needed to cable a 3.5mm audio jack socket I bought (not the PCB mountable one, an external socket). Well, I showed him how to do it, and he wanted to try. Turns out he’s better than me at it :-)
I did one wire and he did the other two, including tinning the loose ends to make it breadboardable. Worked perfectly. He was very satisfied. And I was one happy proud dad.
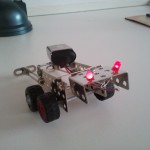
Speaking of which, look what he did a couple of days later. He asked me for some LEDs and wanted to know how to connect them. I just explained that he needed a resistor, gave him some hints on how to wire them up, and he did the rest:
This is just too cute! I truly have a wonderful kid :-)
Code Or GTFO
A good month ago I also started, so to say, a parallel track. Before actually getting into hardware, I thought I could lay out the code, at least in abstract. So I started writing the basis of my sequencer. But soon I realized I needed something less abstract than the virtual machine in my head :-)
In my work experience, I have known some people who are able to approach a project in a very, very systematic way before even starting. People who can write a 200 pages use case document based on a vague idea of what the outcome will be. I always admired those people. Only slightly less their documents :-)
But I’m just not that kind of person. At some point (usually, the sooner the better) I need to start writing code, even pseudocode, or do fake screenshots, or somehow prototype in order to wrap my head around a project. You may say that I’m an agile programmer at heart. Or you may say that I have poor analytical skills. Whatever :-)
So I started prototyping my sequencer code in Perl. Why Perl? Because it’s good at prototyping, as any scripting language, and because I’m a Perl programmer. Weapon of choice, you know. This evolved quickly into a Perl module by itself, which I’ve dubbed Arduino::Pseudo. I tried it with some of the Arduino tutorials, and it does a decent job indeed. The code is actually available on github. I also plan to release the module on CPAN soon. For some definition of “soon”. But I will dedicate a whole blog post to this, so let’s move to the next topic.
Prototype
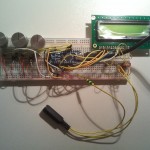
And finally, last week – with my shiny new large breadboard – I was able to come up with a physical prototype. Here it is, in all its glory:
The superluxury aluminium caps are totally worth it. This is just a stripped down version of my sequencer. The knobs are, from left to right:
- tempo
- step selection
- pitch
And the two buttons are:
- start/stop
- write
Output is straight from Arduino tone() function. No monotron is involved yet. The audio output, by the way, is the one I wired up with my kid.
The code is still quite messy and there are a lot of things to do. But hey, it works as I wanted it to work, and it makes music. Sort of. That’s a damn fine reward for all the time and money I invested :-)
That’s it for now. Talk to you in the next post, hopefully sooner than in another month!
cheers,
Aldo


 Fritzing
 Makeblock
 narbotic
Comments are currently closed.